Welcome to the Co3deX
Hello and welcome to the Open 3D Engine CO3DEX, a blog of my Journey’s in Real-time 3D Graphics and Technical Art. My name is Jonny Galloway, I work for @AWSCloud & my opinions are my own. The Open 3D Engine (O3DE.org) is an Apache 2.0-licensed multi-platform 3D engine that enables developers and content creators to build AAA games, cinema-quality 3D worlds, and high-fidelity simulations without any fees or commercial obligations. GitHub: Open 3D Engine (O3DE)
Introduction
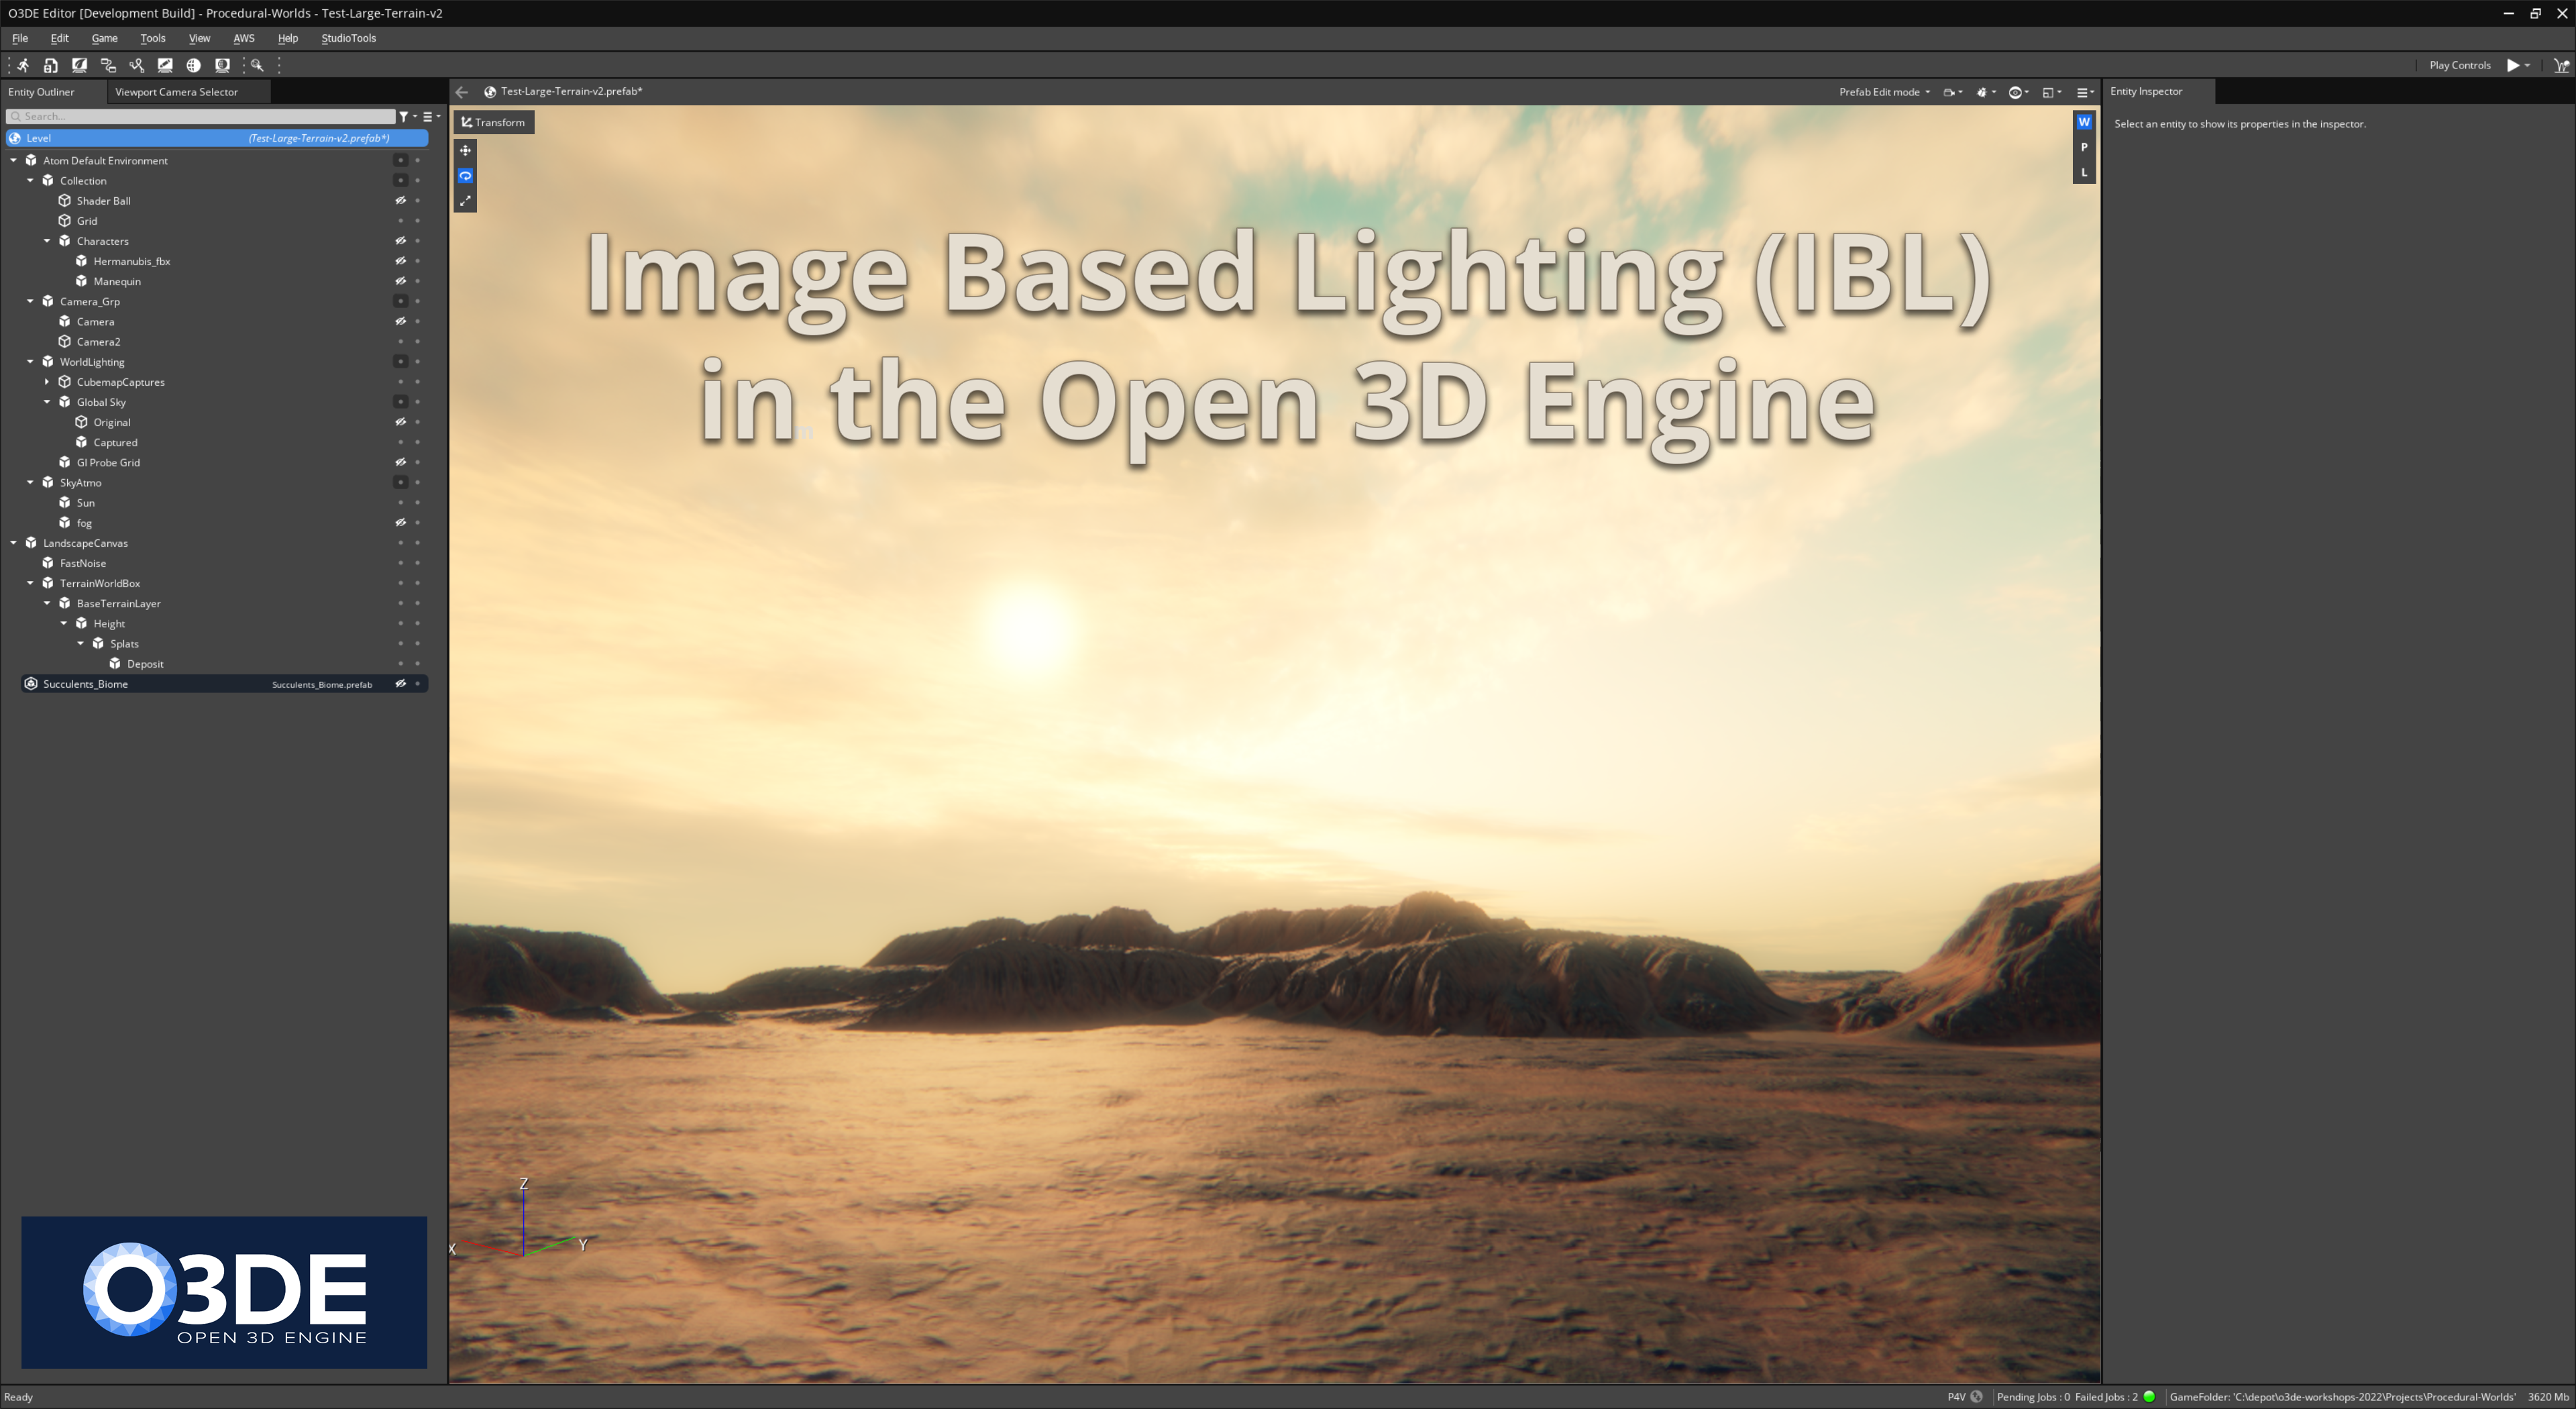
This image of a level in Open 3D Engine (O3DE) uses a combination of lighting techniques, including Image Based Lighting (IBL); a technique used to simulate the lighting in a 3D scene by using an image of a real-world environment as the source of light.
 and directional Sun")
In my last post we covered Frequency Separation to create high-pass textures for use in Physically Based Rendering (PBR) materials, for terrain and environment workflows. Clearly I should write a follow up post on materials themselves (and I will, probably next), but photo-real environments and materials, need realistic lighting, so I felt it would be prudent to cover this topic first. So Let’s set up the global lighting in a scene, to do so we are going to use a technique called Image Based Lighting (IBL), this article is a deep dive on the topic.
This article is lengthy, it’s a deep dive (lowish context, methodical and explicit). But it’s educational, and you do not need to know every single granular detail to set up or use lighting (jump to the end) - but you may want to know more about these concepts if you are a specialist in lighting or a technical artist.
Note: some of the information in this article, in regards to Global Lighting, is covered in my 2022 O3dcon workshop “World Building in Open 3D Engine”, you can download the slide deck here (I’ve replicated some of these slides within the article.)
Image Based Lighting (IBL)
Image-based lighting (IBL) is a technique used to simulate the lighting in a 3D scene by using an image of a real-world environment as the source of light. The image, known as an HDR environment map, is typically captured by taking a photograph of a real-world location or by synthesizing an image using computer graphics techniques.
To generally use IBL in a 3D application, the environment map is first mapped onto a sphere or a cube, which is then used to illuminate the scene. This can be done by applying the environment map as a texture to a special type of light source, such as an infinite light or a skydome light, which is a virtual light that surrounds the scene. (note: this is a general description, we will dive into the O3DE concepts, terminology, components and workflow later in this post.)
The main advantage of using IBL is that it can produce very realistic lighting and reflections in a 3D scene, since it is based on actual photographs of real-world environments. This can be especially useful for creating realistic visualizations of architectural designs, product prototypes, and other objects that will be seen in real-world settings. (aka Look Development)
IBL is also often used in computer graphics for film and video game development, where it can help to create more realistic and immersive virtual environments.
Here is a look, this is an image of a environment I rendered in O3DE using IBL, it primarily uses a real-world HDRi for all of the subtle qualities and fidelity of lighting, along with a Sun (directional light).

(Don’t mind the obvious CG flaws: I didn’t provide specular occlusion, engine doesn’t have contact shadows yet. This level can be viewed in the o3de-workshops-2022, once you have the project up and running load the “Test-Large-Terrain” level.)
Terminology

Let’s cover some terminology…
High Dynamic Range (HDR) capable renderer is a type of software that is able to display and process images with a wider range of colors and brightness levels than traditional renderers. This allows for more realistic and accurate representations of real-world lighting and color, including bright highlights and deep shadows. HDR rendering is often used in the film and video game industries to create more immersive and visually stunning experiences.
Standard Dynamic Range (SDR) is a term used to describe the typical range of brightness and color that most current displays, such as computer monitors, TVs and mobile screens, are able to produce. In SDR, the range of brightness is limited, and the color space is smaller than what is possible with HDR (High Dynamic Range) displays. SDR images have a lower contrast ratio and less vivid colors than HDR images. Therefore, SDR images are not able to represent the full range of real-world lighting and color, and may appear less realistic and immersive than HDR images.
HDR tone mapping is a technique used to display high dynamic range (HDR) images on devices that have a lower dynamic range, such as standard computer monitors or TVs. The process involves compressing the wide range of brightness levels in an HDR image into the narrower range that can be displayed by the output device. This is done by applying a mathematical algorithm, called a tone mapping operator, to the HDR image. The goal of tone mapping is to preserve as much of the original image’s visual information as possible while still ensuring that it can be properly displayed on the output device. This can include adjusting the contrast, brightness, and color saturation of the image to achieve a more visually pleasing result.
Look Development aka LookDev is the process of creating and refining the visual style of a 3D computer graphics (CG) character, object, or environment. It involves designing and defining the appearance of the CG assets, including the textures, materials, lighting, and shading, to achieve a desired visual look. IBL is very important to the LookDev workflow as we will explore in this article.
Image Based Lighting (IBL) we have covered this above. This is when we use the HDRi as a lighting source for the scene. This is typically a globally defined entity. We also generate local probes that capture scene lighting, these would capture the inbound global lighting and propogate lighting into other systems like global illumination and eventually contribut light to material shading on objects in the scene.
Specular reflections are the shiny, mirror-like reflections that are often seen on smooth and polished surfaces. They are caused by light bouncing off a surface at a single, well-defined angle, and are typically brighter and more focused than diffuse reflections, which are more scattered and soft. They are often used in conjunction with other techniques, such as normal mapping and environment mapping, to create more realistic and convincing surfaces. In O3DE the specular reflections are dealt with via a combination of various components and rendering algorithms, including the Light entities, Global Skylight (IBL), reflection probes (baked reflection volume), screen space reflections (SSR), and/or ray-traced reflections.
Indirect diffuse lighting is the diffuse (scattered) light that has been reflected off of one or more surfaces before reaching a given point. Indirect diffuse lighting is often simulated using global illumination algorithms, which attempt to calculate the way light is scattered and reflected throughout a 3D scene. Indirect diffuse lighting is important for creating realistic and believable lighting in 3D graphics, as it helps to simulate the way light bounces off of multiple surfaces and fills in the shadows (ever look and notice shadows are not actually black.) Indirect diffuse lighting can also contribute to the overall atmosphere and mood of a scene, as it can help to create soft, diffuse lighting that helps to create a sense of ambient light and depth. There are several different algorithms and techniques that can be used to simulate indirect diffuse lighting in 3D graphics, including raytracing, radiosity, and global illumination. These techniques all have their own strengths and limitations, and are often used in combination to achieve the desired lighting effect.
HDRi is synonymous with IBL, it is a panoramic photo, which covers all angles from a single point and contains a large amount of data (usually HDR 32 bits per pixel per channel), which can be used for the illumination of CG scene. This is a source input image (.exr, or .hdr), and it is usually a LatLong format (but other formats exist).

The awesome team at Polyhaven.com, has a large collection of freely available HDRi source images you can utilize in O3DE (and other engines) HDRIs • Poly Haven
HDRi images are often created by taking multiple photographs of a scene at different exposures and then combining them into a single image. The resulting image has a higher dynamic range, which means that it can capture a wider range of tonal values and better represent the full range of luminance in the scene.
The process of creating an HDRi image from multiple exposures is often referred to as “bracketing” or “exposure bracketing”. This involves taking a series of photographs at different exposures, typically by adjusting the camera’s aperture, shutter speed, or ISO sensitivity. The resulting photographs are then combined using specialized software to create the final HDRi image.
Cubemap is a type of texture that contains 6 square 2D images, each one representing the view from a direction along the coordinate axes (up, down, left, right, front, and back). Cubemaps are commonly used in 3D computer graphics to simulate reflections or to create the illusion of being inside a space. When we pass a HDRi source image to O3DE, the runtime asset output is a processed cubemap (the processing of the cubemap varies based on use.) Cubemap Description - polycount and Cube mapping - Wikipedia
Convolved Cubemap represents the light of the environment around a 3D object. Convolution is a mathematical operation that is used to blur or sharpen an image, or to extract features from it. In the case of a convolved cubemap, convolution is used to simulate the way that light interacts with the environment, by blurring the texture using importance sampling of inbound light (stored as mip chain). In O3DE when a source HDRi is processed, the floating point lighting are convolved, generally the source (latlong), is processed into lighting cubemaps (diffuse, and specular) . This allows the HDRi to be used to create more realistic reflections on the surface of an object. Nvidia reference on Importance Sampling, and mip map sampling:
Chapter 20 GPU-Based Importance Sampling NVIDIA Developer
EXR is a high dynamic range (HDR) image file format developed by Industrial Light & Magic (ILM) for use in computer graphics and visual effects workflows. EXR is an open format, meaning that anyone can use it without having to pay any licensing fees. This is the HDR image format supported in O3DE (there is another format commonly used .hdr, which is not yet supported by O3DE.)
Skylight a skylight is a type of light source that simulates the lighting from the sky. Skylights are often used to illuminate outdoor environments or to create the illusion of an outdoor environment inside a building or other enclosed space. Skylights are implemented as a special type of light source called a “skydome” light or an “infinite” light. These lights are typically set up to surround the 3D scene and simulate the diffuse, ambient lighting that comes from the sky. In O3DE the engine provides a component called “Global Skylight (IBL)” to load this data for lighting.
Skydome aka Skybox is a 3D computer graphics technique used to simulate the appearance of the sky or a surrounding environment from a specific viewpoint. It is implemented as a sphere or hemisphere that surrounds the 3D scene, with a texture applied to the inside surface of the sphere. When the scene is rendered, the texture on the sphere is used to simulate the view of the sky or environment from the viewer’s perspective. In O3DE the engine provides a component called “HDRi Skybox”. In O3DE the skydome loads a cubemap, and is rendered as a view-dependent fullscreen pass, but for all intents and purpose you can think of it as a sphere project that is infinitely far away (behind everything else.)
Sky and Atmosphere aka “Physical Sky” is a feature in some 3D engines such as O3DE, which allows the artist to simulate the appearance of the sky and the surrounding atmosphere in a realistic way. A sky atmosphere component typically consists of a set of algorithms and parameters that are used to model the scattering of light through the atmosphere, as well as the appearance of the sky itself. Physically based sky and atmosphere refers to the use of physically based rendering (PBR) techniques to simulate the appearance of the sky and atmosphere. PBR techniques aim to accurately model the physical properties of materials and lighting, and are based on the principles of real-world physics. The artist can adjust various parameters to control the appearance of the sky and atmosphere, such as the time of day, the sun’s position and intensity, the sky’s color and turbidity, and the atmospheric scattering coefficients. These parameters can be used to create a wide range of sky and atmospheric effects, such as clear blue skies, overcast conditions, sunsets, and atmospheric haze. O3DE has a component called “Sky Atmosphere” that provides this, it can be used along with a skybox that renders behind it in the distance.

We won’t get into Sky Atmosphere in this article, but that is where I would go next to advance the look and feel of my level default global lighting. We will walk into more advanced topics of physically based lighting, atmospherics and similar topics in future posts. That’s pretty much all of the core topics, let’s dig in.
Set Up
This article assumes that you are already somewhat familiar with O3DE:
- You already have it installed:
- Or built from source:
- o3de.org/configure-and-build.md at main · o3de/o3de.org · GitHub
- And that you know how to create a project:
Find an HDRi you like, such as one of these:
Clarens Midday HDRI • Poly Haven
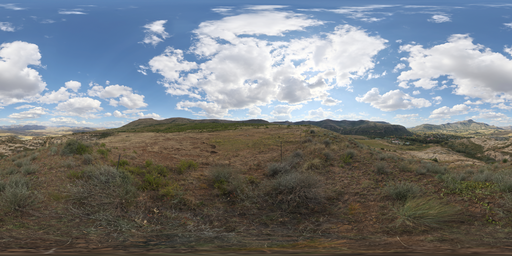
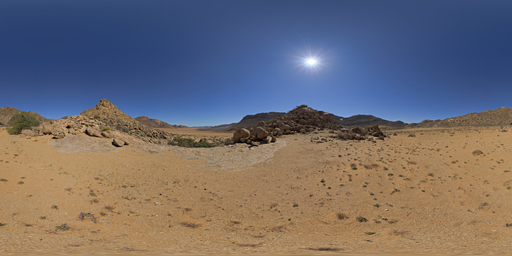
Goegap HDRI • Poly Haven < – this is the one we use below, it’s already set up in O3DE.
Prewire
There are a few things to understand about the IBL workflows, so you can better make decisions about the approach you may need to take to get the best results.
-
You can use an IBL source image that is 8-bit (sRGB), but this is going to result if pretty flat and dull lighting, as it will be Standard Dynamic Range (SDR) vs High Dynamic Range (HDR). An HDR image representing multiple stops of “exposure bracketing” is recommended, such as those found at Polyhaven.com/hdris
-
You should be judicious with the resolution of your HDRi, the source EXR assets may have a considerable file size on disk, and the generated HDR cubemaps will consume more VRAM then a standard 8-bit color texture would. You also want to consider the screen size of your games viewport; if you want a crisp skybox you’ll need more resolution, so if you are working in 4k you might actually need an 8k source HDRi, but generally a 4k is sufficient for most needs, and you can often get away with a 2k EXR (this is subjective and up to you to decide.)
-
EXR is the recommended image format for feeding HDRi source assets to the O3DE Asset Processor, as it supports HDR floating point values (32-bit). Other texture formats will work also, but the EXR will yield superior results.
- There are a couple places in the engine you can find default examples; these are provided for the default level, and as LightingPreset environments in the Material Editor:
-
Tip: lighting preset files, named *.lightingpreset.azasset are JSON files, that define a lighting preset to used in 3D viewports such as the Material Editor, or Asset Browser preview. This allows you a pre-defined set of lighting environments you can quickly switch between when authoring materials. These can live in any asset folder (of the engine, your project, or an asset gem.) They are hand editable in a text editor, or they can be made in the Material Editor Viewport Settings panel. Any LightingPresets found will be surfaced in the Material Editor for use.
-
Tip: You can use the CubeMap Capture Component placed anywhere in your level, to bake out specular and diffuse cubemaps, via this approach you can make LightingPresets from any of your game levels!
- IBL itself will provide global indirect lighting (diffuse light, you can think of this as ambient light), and reflections (specular). But no shadows are generated from this lighting (that could however possibly be done with real-time raytracing in the future); what this means is that generally you will be adding a Directional Light component, which will act as the Sun and cast shadows into the scene (as seen in the car rendering above.) Why this is important, is that if your HDRi is high-contrast and includes a visible Sun, that will mean bright light energy coming from the skylight (via your lighting cubemaps), and when the Directional Light is added, it will also add its light energy (effectively, incorrect doubling of the Sun’s light energy.) To counteract this, you would need to duplicate the image, and in the copy paint out the Sun (this can be quite a headache, doing this with clouds is difficult to say the least) The original image with the visible Sun can be used as your HDRi Skybox, and the modified version without the Sun as the Global Skylight (IBL). Then the Suns lighting energy will be replaced with the Directional Light.
-
You can find low-contrast HDRis here, that may not need to be manipulated
-
We’ll cover the High-Contrast workflow below in the article.
- The Low-Contrast workflow is similar, it’s easier because it doesn’t require the modification to a duplicate of the HDRi to paint out the Sun.
- An alternate workflow, is to use the Sky Atmosphere component which will render a Sun and atmosphere into the Skybox pass. This can be combined with a HDRi skybox that renders as the furthest background layer. (results will vary, but you have options here based on your needs.)
-
-
In O3DE, the most common approach is to use texture naming conventions with asset file names, as a way to inform the Asset Processor what type of asset it is, and how to process it (which image processing profile to apply), to generate the correct output products (process into IBL cubemaps, versus a standard texture format.) We also refer to these as ‘file masks’, and they are formatted as a
_suffixat the end of the file name. There are several of these that are relevant to the IBL workflow, we will cover those below. The alternative, is that you can use the Texture Settings User Interface to assign the correct profile without altering the file name (this is stored as metadata in a.assetinfosidecar file.) - Note: in this article, we are using HDR lighting, and Atom (the O3DE rendering engine) is an HDR capable renderer. Atom can output final imagery to be displayed on a variety of devices with different display capabilities (SDR vs HDR) using tone mapping. For this article we rendering in HDR but displaying the final post-tone-mapped images on a SDR sRGB monitor (The web doesn’t really deal with HDR display well, with the exception of HDR videos.)
HDRi, IBL Naming Conventions
This slide from my presentation covers the most common HDRi naming conventions used with IBL

A High-Contrast HDRi where you have two copies of the source, one with the Sun (skybox), and one without (lighting), will need these two naming conventions
1. _SkyboxCM
-
This will only generate a high-res cubemap that is suitable for use as a Skybox.
-
This will generally be the highest resolution cubemap.
-
It will not include any mip maps
-
The cubemap generated (in the project cache) will be named:
- < HDRi name >
_skyboxcm.exr.streamingimage - Use this in the “HDRi Skybox Component”
- < HDRi name >
2. _IBLglobalCM
-
This will only generate the global indirect diffuse and specular reflections lighting cubemaps:
- Specular:
- This will be a medium resolution cubemap
- This cubemap will include a mip-map chain processed for lighting, these are tied to the roughness value of PBR materials (the more reflective the surface a higher res mip is sampled for sharper reflections, in essence a more rough surface will sample a lower resolution mip and have softer/blurrier reflections.)
- The cubemap(s) generated (in the project cache) will be named:
-
< HDRi name > _iblglobalcm
_iblspecular.exr.stream… -
Use this in the “Global Skylight (IBL) Component”
-
- Diffuse:
- This will be a low resolution cubemap
- It will not include any mip maps
- The cubemap generated (in the project cache) will be named:
-
< HDRi name > _iblglobalcm
_ibldiffuse.exr.stream… -
Use this in the “Global Skylight (IBL) Component”
-
3. _IBLskyboxCM
A Low-Contrast HDRi that doesn’t have a strong or visible Sun, may not need a duplicate source image, and can most likely just use this naming convention.
- This will generate all three cubemap output products:
- < HDRi name > _skyboxcm
.exr.streamingimage - < HDRi name > _iblglobalcm
_iblspecular.exr.stream… - < HDRi name > _iblglobalcm
_ibldiffuse.exr.stream…
- < HDRi name > _skyboxcm
Getting Started
Let’s do this …
-
Start the O3DE Project manager (o3de.exe)
- Start you project, open the Editor:
- I am using my 2023 workshop project: o3de-workshops-2022/Projects/Procedural-Worlds
-
Download your HDRi (we used this at 8k): Goegap HDRI • Poly Haven
- Rename the file, I used the file mask:
- goegap_4k
_IBLskyboxCM
- goegap_4k
- Move to an asset folder, in this post we are using the default:
C:\path\to\o3de\Gems\Atom\Feature\Common\Assets\LightingPresets\HighContrast\goegap_4k_iblglobalcm.exrC:\path\to\o3de\Gems\Atom\Feature\Common\Assets\LightingPresets\HighContrast\goegap_4k_skyboxcm.exr
-
When you start the Editor, it will start the Asset Processor. You can find it in the system tray. Allow it to finish processing assets, then the Editor will start.
- When the Editor is open, create a new level, I called mine “HDRi_test”. The default level looks like this:

High-Contrast workflow
The default level, uses the High-Contrast workflow, with this HDRi setup:
-
The original image (with Sun) to be used as the Skybox is:
o3de\Gems\Atom\Feature\Common\Assets\LightingPresets\HighContrast\goegap_4k_iblglobalcm.exr -
The duplicate with Sun painted out is:
o3de\Gems\Atom\Feature\Common\Assets\LightingPresets\HighContrast\goegap_4k_skyboxcm.exr
Why this setup?
-
The HDRi has a visible Sun, we are going to render that in the skybox so it’s visible. This will be the original source goegap_4k, with the file mask suffix
_skyboxcm, which will only generate skybox cubemap (not convolved, no mips) -
The duplicate has the Sun painted out, so we can use it to generate the global lighting cubemaps, with the file mask suffix
_iblglobalcm, which will generate a set of convolved diffuse and specular cubemaps (global skylight)
Anatomy of Default Level (Global Lighting)
Let’s breakdown the Anatomy of the O3DEs current default level and dissect the way Global Lighting is set up …

- An HDRi was selected: Goegap HDRI • Poly Haven
-
It was selected because it’s easy to work with, but it’s fairly saturated and has variation in color, however it also it has no clouds (and that makes it easier to paint out the Sun.)
-
Downloaded as EXR
-
- The file was put into a O3DE Asset folder, in this example that location is nested in an Atom Gem folder within O3DE (it’s in an engine asset folder, as it comes with the pre-built installer version of the engine.) Here are some examples of suitable locations:
-
< project > / Skies / *.exr
-
< project > / Levels / Q3DM17 / Sky / *.exr
-
< asset gem > / Assets / Skies / *.exr
-
… it’s up to you to decide how you organize your data
-
- The original source file was renamed with file mask suffix for a skybox cubemap:
- goegap_4k
_skyboxcm.exr
- goegap_4k
- The files was duplicated, then renamed with file mask suffix for a global lighting cubemaps:
- goegap_4k
_iblglobalcm.exr
- goegap_4k
- This duplicate was open in an image editor (Photoshop) and the Sun was removed.
This type of setup creates a static lighting environment; the sun and lighting don’t move, no dynamic time of day. Those things may be possible but are out of the scope for this article. A static HDR lighting environment is still great for many small environments or games that don’t need dynamic time of day, and the uses cases are many such as product visualization, architectural visualization, etc.
Sibling HDRi
In this slide, on the left is the duplicate set of the source image files, in a HDRi latlong format; the duplicate has the Sun removed. On the right, it a visualization of the output, convolved lighting cubemaps specular reflections and indirect diffuse light.

- First, note that in the Asset Browser (lower left quadrant of the Editor), shows the duplicate set of HDRi siblings (you can search and filter by name); and beneath them it shows the output products they generate (texture streaming assets). The
_skyboxcmsource only generates one output cubemap, the_iblglobalcmasset is generating many, because it creates the diffuse and the specular which includes several levels of mip maps (you don’t need to work the mips directly in the workflow, I am just pointing out what you are seeing.) -
O3DE Levels, have a root node called the Level Entity (this is useful for setting up global level singletons, like some of the terrain system components.)
- Beneath that, in the Default Level, there is a node called “Atom Default Environment”, populated with the template level entities (Atom is the O3DE rendering engine, and this concept of a default level, and it’s make up, were developed with Atom before a complete integration with the engine system and editor frameworks.)
- Beneath that, we are looking for the Entity called “Global Sky”. If you select this (in the Entity Outliner on the left), you will see it has two component cards attached to it (seen on the right of the screen, in the Entity Inspector.)
- Global Skylight (IBL), this loads the diffuse and specular lighting cubemaps
- HDRi Skybox, this loads the generated skybox cubemap
- Global Skylight (IBL), this loads the diffuse and specular lighting cubemaps


HDRi Skybox
The original HDRi with the visible Sun is loaded here.

Global Skylight (IBL), Specular
The duplicate with the Sun painted out, created a convolved specular cubemap and this is loaded here, in the field labeled ‘Specular image’.

Global Skylight (IBL), Diffuse
The duplicate with the Sun painted out, also created a convolved diffuse cubemap and this is also loaded here in the first slot, labeled ‘Diffuse image’.

Note: in this slide, I am using the diffuse cubemap as the skybox - I just wanted to visually show the concept of what the lighting environment looked like as a latlong projection and suggest the idea that this is the inbound indirect diffuse light. When you follow the workflow, you’ll have the previous high-res skybox (It is possible to actually load the soft diffuse cubemap into the skybox and render it, this is used intentionally in all of the Material Editors LightingPresets as a visually less distracting LookDev mode.)
Tip: It’s also possible to now take the O3DE cubemaps (skybox, specular and diffuse) and use them outside in external applications such as 3D Digital Content creation tools such as Maya and Blender (take your game lighting with you.) Maya as an example can utilize the cubemaps directly (if you have the DDS loader plugin active), you can load them into a StingrayPBS material. Other applications or workflows may prefer a LatLong, a good example is Marmoset Toolbag, you could use the same source EXR to build a matching lighting environment in that tool. If you want to convert O3DE cubemaps back into a LatLong format, you could use a tool like GitHub - dariomanesku/cmftStudio: cmftStudio:
I call this ‘Synced Lighting Workflow’, and it could be it’s own future post. Each DCC tools capabilities and workflows are slightly different, so this would be a lengthy and detailed article (looking forward to writing it.)
Directional Light (Sun)
Now to generate shadows and provide the Sun’s lighting Energy, there is an Entity called “Sun”, if you select this, in the “Entity Inspector” on the right-edge of the Editor, you will see this Entity has a Directional Light Component. This component’s transform, is then angled so the light is aligned with the Sun’s position in the Sky.

Tip: If you’d like to make it easier to accurately align the entity rotation to match the Sun angle in the sky, you can use this trick. Create a Camera Entity and parent the Sun (directional light) to it, then you can ‘look through’ this camera and point it to the Sun.
-
Create an Entity: Camera-Sun, add a Camera Component
- Select the Sun (directional light), and drag-n-drop the Sun onto it so it’s a child
-
After parenting the Sun to Camera, zero out the Sun’s transform (directional light), then set it’s Z rotation to 180. Basically, you want a setup where as you move the camera, the Sun moves with it.
- Then Right-Click on the the 3D Viewport Toolbar to open the context menu, and use this command to look through this camera: camera > Camera-Sun

Your setup will look and behave like this:

And when you look through the camera, you will be able to pan to align with the Sun

Tip: If you open your EXR in Photoshop, you can sample the color and intensity of the Sun in the sky.

In this article, we are not going to dig past the surface plane of physically based lighting, that is a whole in-depth topic. But basically, we can use these sampled values from Photoshop as a starting point for HDR lighting values. Note: this is not necessarily accurate physically based HDR lighting values, we’d need to focus on a much more technical workflow for that, but it is HDR (high dynamic range) and good enough as a starting point.
Here is our 32-bit color picker:

-
The sRGB value in the lower right, can be used as the color for the Sun (directional light)
-
And the Intensity is the number of stops of Exposure value for that brightness. This can be plugged into the Intensity of our Sun (directional light.)

Note: It’s important to understand “color space” (sRGB, Linear RGB, ACEScg, etc.) and “color model” (RGB or HSV, etc.), but that could also be a whole in-depth article. What’s important to know, is that in the color picker you are visually working with color picking in the sRGB color space, but the values that Color Pickers returns for the renderer are converted to and stored in a Linear RGB Color Space.

Global Lighting Exposure
Now we have really bright lighting from the Sun, but much brighter then the ambient indirect lighting and skybox. So next, we need to increase the exposure of those elements as well to put everything into a similar HDR range.
Select the Entity named “Global Sky” and set the Exposure value on the Global Skylight (IBL) and Skybox (HDRi) components. This will put them into a similar HDR range (again, this is not accurate … just a starting point, you’ll have to tune and balance the exposure for lighting to your own taste.)

Now the lighting is blown out everywhere, what the hell!?
Why would I want to do this?

This is because the renderer is physically based (PBR), so we are emulating real-world light energy; the renderer is a virtual camera like a DSLR (or your smartphone), and we need the camera to auto-expose the HDR light energy back into a into the range that looks good and is pleasing to human eyeballs.
Here are the steps to do that:
-
Select the main Camera Entity
-
Add the Exposure Control Component
-
This requires adding the PostFX Layer Component
-
Now in the Exposure component, set the Control Type to “Eye Adaptation”
This will enable auto-exposure on your main camera (for now, don’t worry about concepts such as PostFX Layers or Volumes, which can be covered in a future article.) This is set up to mimic the way the human eye responds to light when moving in and out of light to dark areas.

Now you might still wonder why we want to continue down this path, because it looks the same as before we set HDR exposure values on the global sky and lighting. The reason, is because in many environments we will want both bright HDR outdoor lighting, as well as realistic indoor lighting with much lower energy levels - imagine walking from a bright outdoor environment, into a dark cave dimly lit cave only lit with bounce Global Illumination (GI) light or a few torches - when you walk into the cave your iris will open up to allow more light in, in effect your eyes are performing an automatic exposure to adapt your vision to the darkness (Exposure Control mimics this.)
Exposure Heatmap
We can see a little more about what is going on under the hood, and this will be useful to understand the internals of the renderer so in the future we can move onto more advanced lighting concepts and workflows. Let’s enable the exposure heatmap.
-
Select the main Camera Entity
-
Enable the toggle labeled ‘Enable Heatmap’
-
Pan the camera around the scene
This heatmap allows us to visualize the inbound lighting energy that camera plane is receiving, much like an advanced mode for photography on a professional DSLR. As we move the camera view around, we can see the histogram update to represent the light energy entering the view.
Note: the hump of the histogram stays roughly around 10 EV, the exposure value we happened to use as the base value for our Sun (directional light) and IBL (skybox, skylight.) Also notice, that the Sun pixels render red, this shows that those pixels are above the exposure threshold value of “Maximum Exposure”, if you lower that value you’ll see that more of the pixels clip red. These are helpful tools for Lighitng Specialist who want the most accurate results when working with physically based rendering.

In reality, this outdoor scene with no clouds in the sky should be in the 14-16 EV range along the lines of Full sunlight on a cloudless day, bright subject (i.e. the beach). This is an easy enough fix, you can go back and adjust your light EV values and bump them all to 15 or 16… you won’t notice much of a difference because the Camera Exposure Control component will compensate with auto-exposure adjustments, but it will be a more correct global energy level, and lighting cascades into many other systems, so it’s vital to have an understanding of what is actually going on. Imagine that you are working towards building a Digital Twin or a Simulation, that has a virtualized emulation of a real-world camera sensor; in such a situation you may need to be as accurate as possible and expect these inbound values to mimic reality. Games fortunately are very forgiving, so you may play outside the lines or accuracy and simply tune things until you think they look great for your use case.

Above is a another beauty shot of our terrain based world. It’s goes a bit beyond the lighting techniques above; I used a low-contrast HDRi (no visible Sun) which was then modified in Photoshop, and in addition to the Sun (directional light), I’ve also added the Sky Atmosphere component and some PostFX (Depth of Field, color grading, etc.) Then after tuning the global lighting, I used the Cubemap Capture component to bake new global lighting cubemaps (diffuse and specular reflections) which I used as replacements in the Skylight (but retained the original skybox), as this approach will include capturing the terrain and the atmospherics into those replacement cubemaps which enhances the realism even further.
Reference
Here are some additional reference links:
-
How the Hell do I make a cubemap with my own art? The Art of Jude Godin
-
Image Based Lighting - 3Delight for Maya (RenderMan) - 3DL Docs
import logging as _logging
_MODULENAME = 'co3dex.posts.image_based_lighting'
_LOGGER = _logging.getLogger(_MODULENAME)
_LOGGER.info(f'Initializing: {_MODULENAME} ... Image Based Lighting!')
Disclaimer: Views expressed are my own. All opinions are my own. The opinions expressed here belong solely to myself, and do not reflect the views of my current employer Sony Interactive Entertainment (SIE), any previous employers including AWS/Amazon, the Open 3D Foundation, or their parent the Linux Foundation. I am bound by NDAs with my current and previous employers and am not authorized to speak on their behalf. If you are a reporter or news outlet seeking official statements, please contact the respective company's PR department (I will not reply to such requests).
License: For terms please see the LICENSE*.TXT file at the root of this distribution.
// Copyright HogJonny-AMZN. or his affiliates. All Rights Reserved.
// SPDX-License-Identifier: CC-BY-4.0